Blog

  • How to Enable DNS over HTTPS in Firefox for Max Security

    How to Enable DNS over HTTPS in Firefox for Max Security

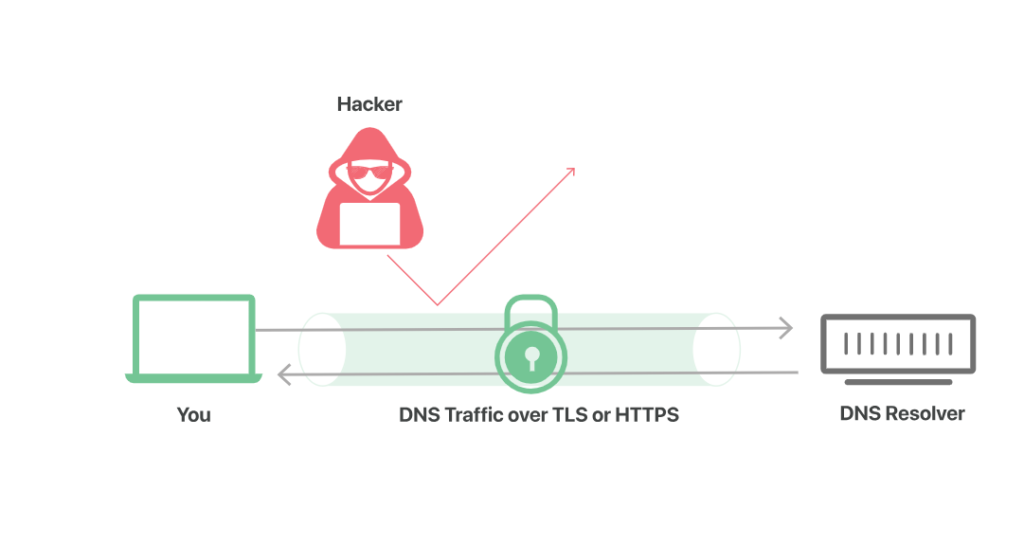
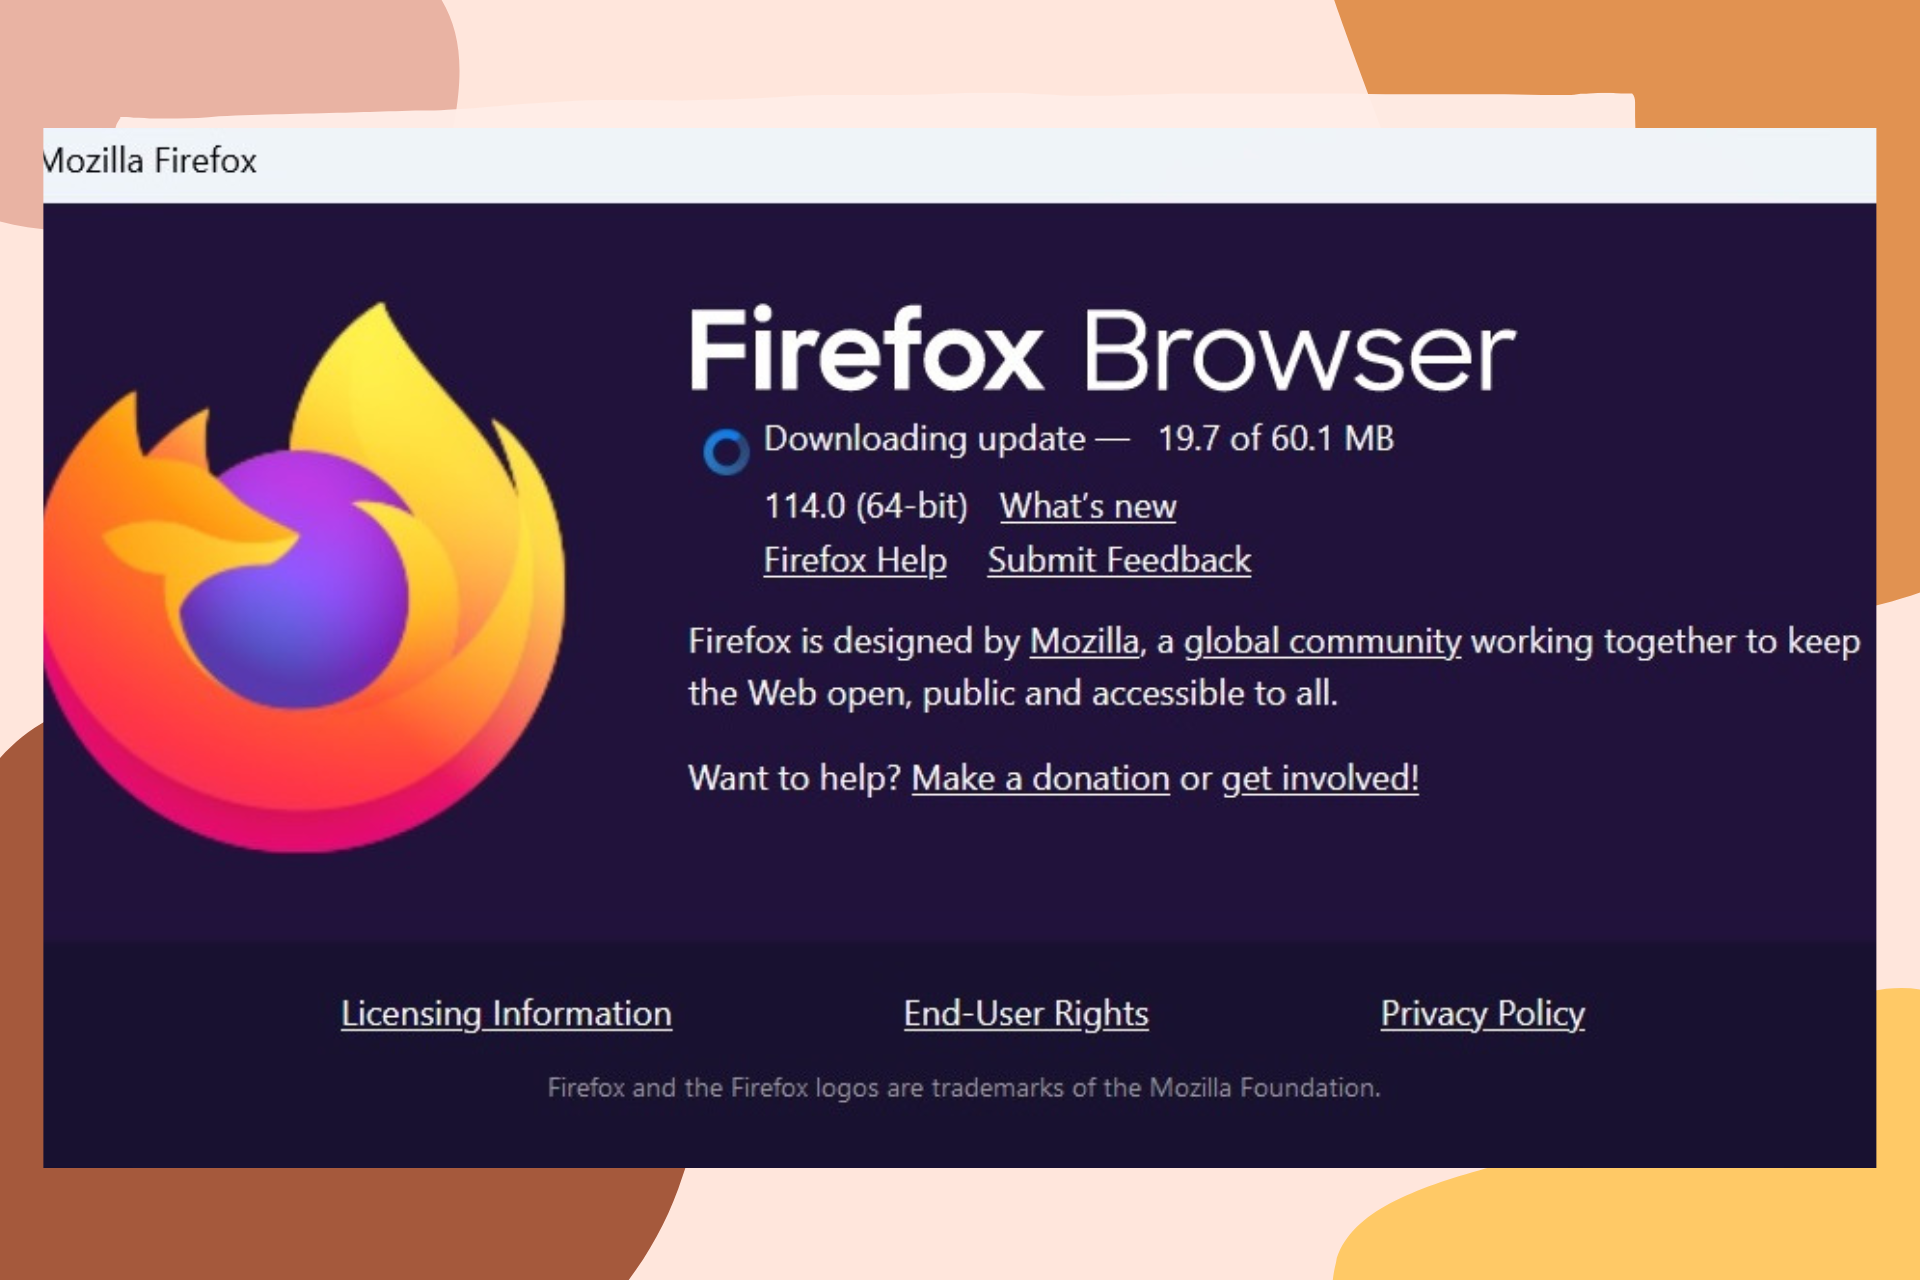
    Mozilla Firefox, one of the most rated privacy-centric browsers made a shift to DNS over HTTPS (DoH) as a more secure alternative to prevent spying and exploitations.

    DoH encrypts your DNS lookups in an encrypted HTTPS connection. This means whenever you type a website address, DoH takes your query and sends it to a DoH-compatible server, which in this case is Cloudflare through an encrypted HTTPS connection, thus making it harder for third parties to see which websites you’re about to access.

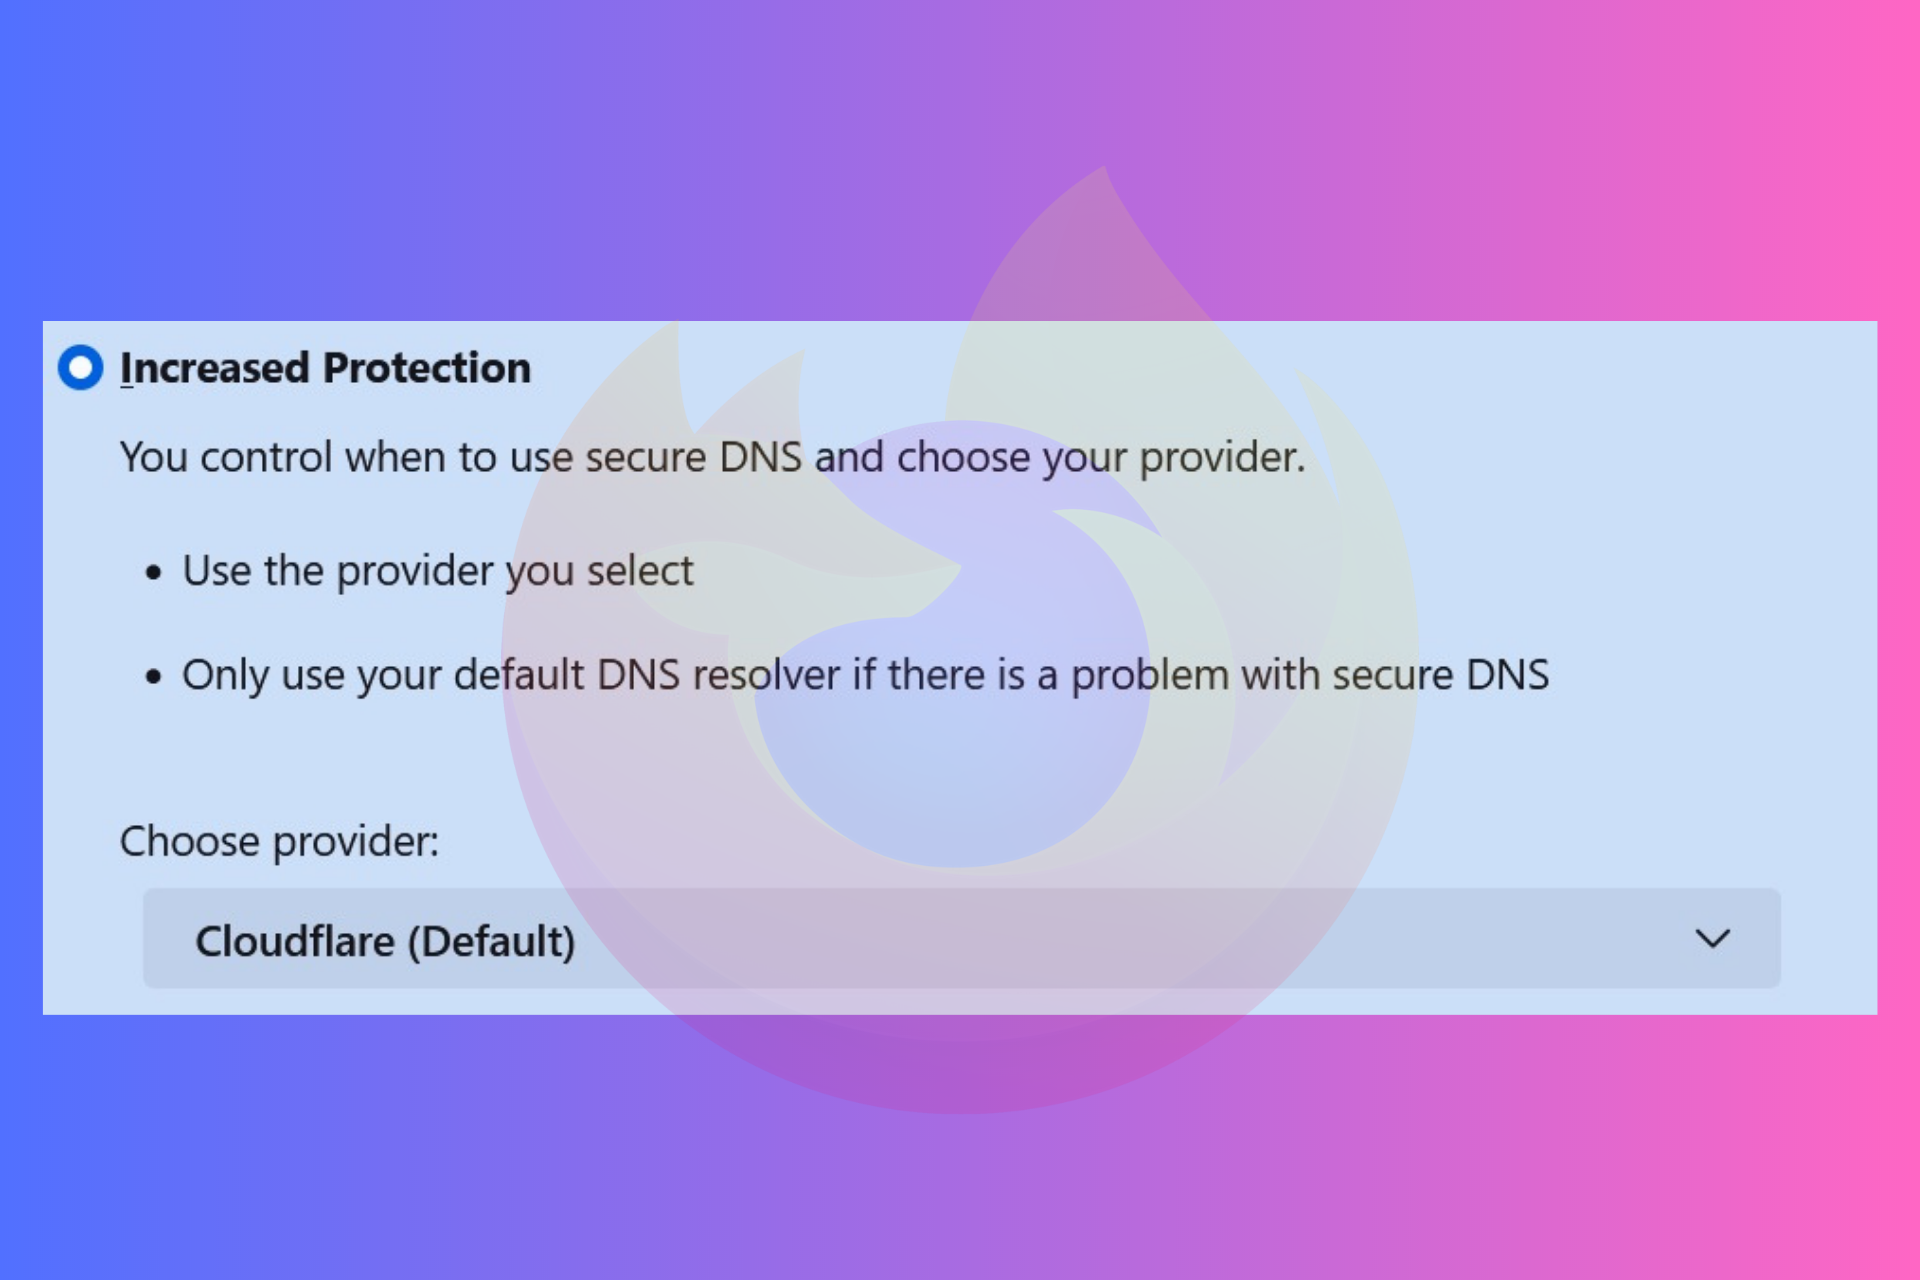
    Firefox offers four protection levels which you can select for maximum security. By default, the browser decides when to use secure DNS to protect your privacy.

    DNS over HTTPS illustration
    An illustration by Cloudflare.

    There are three other options to select from, namely Increase Protection and Max Protection. Based on the protection level you use, the status indicator will reflect accordingly.

    You can turn it off as well in case you have a local DNS resolver. Firefox uses Cloudflare’s DNS over HTTPS service by default, however, users can manually change to some other encrypted DNS service.

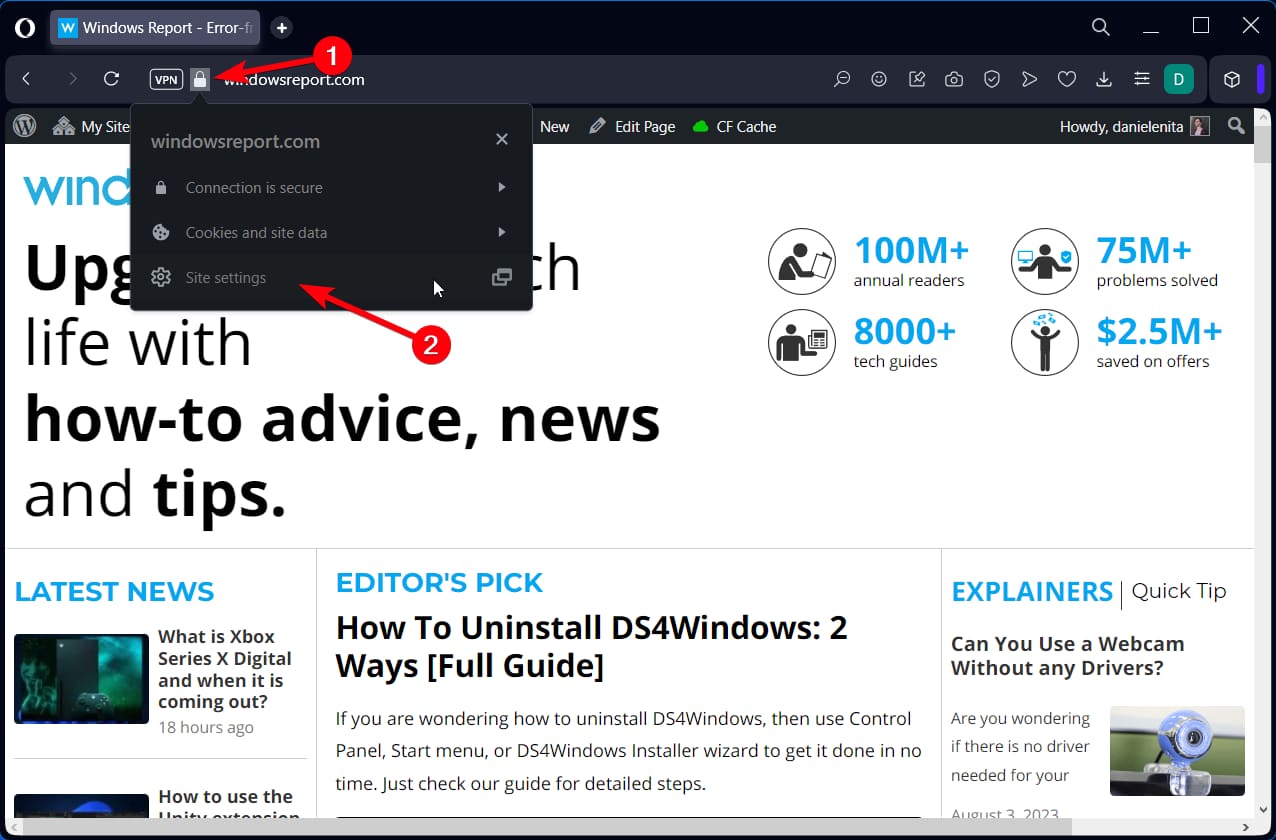
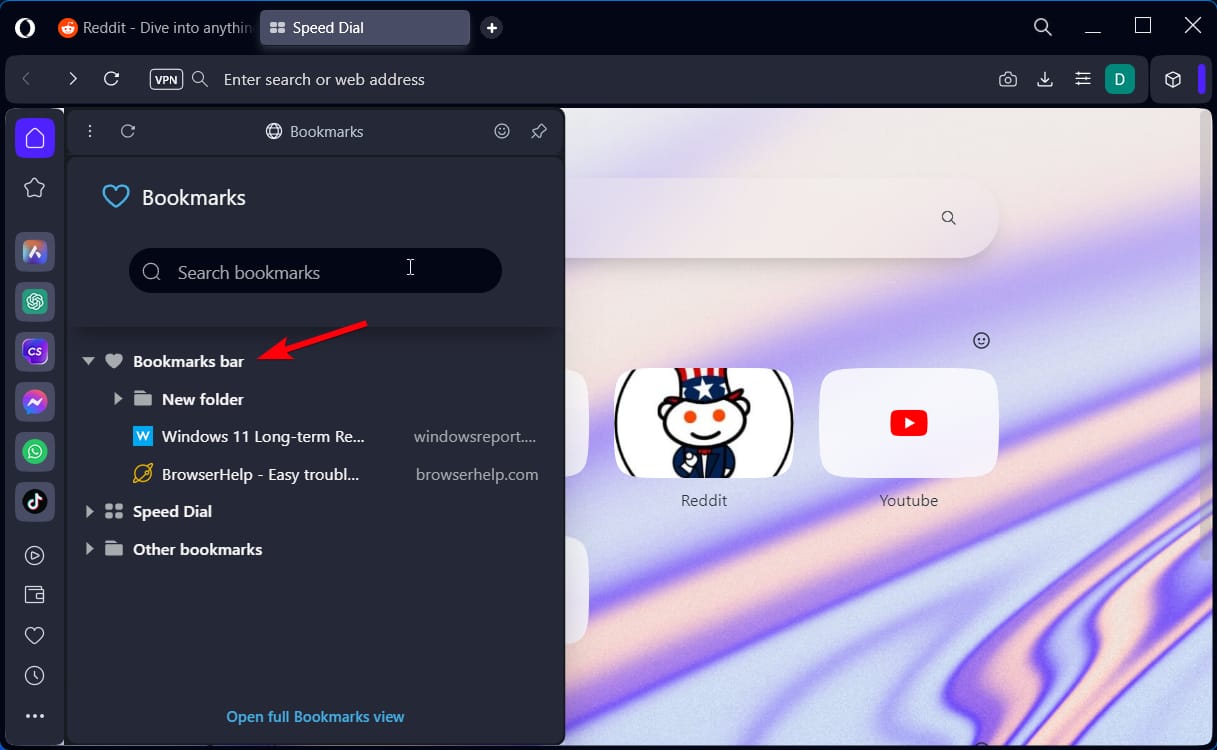
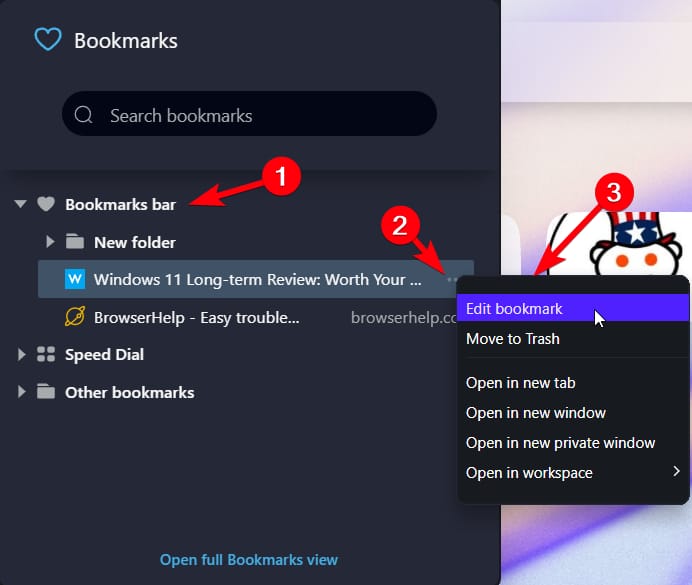
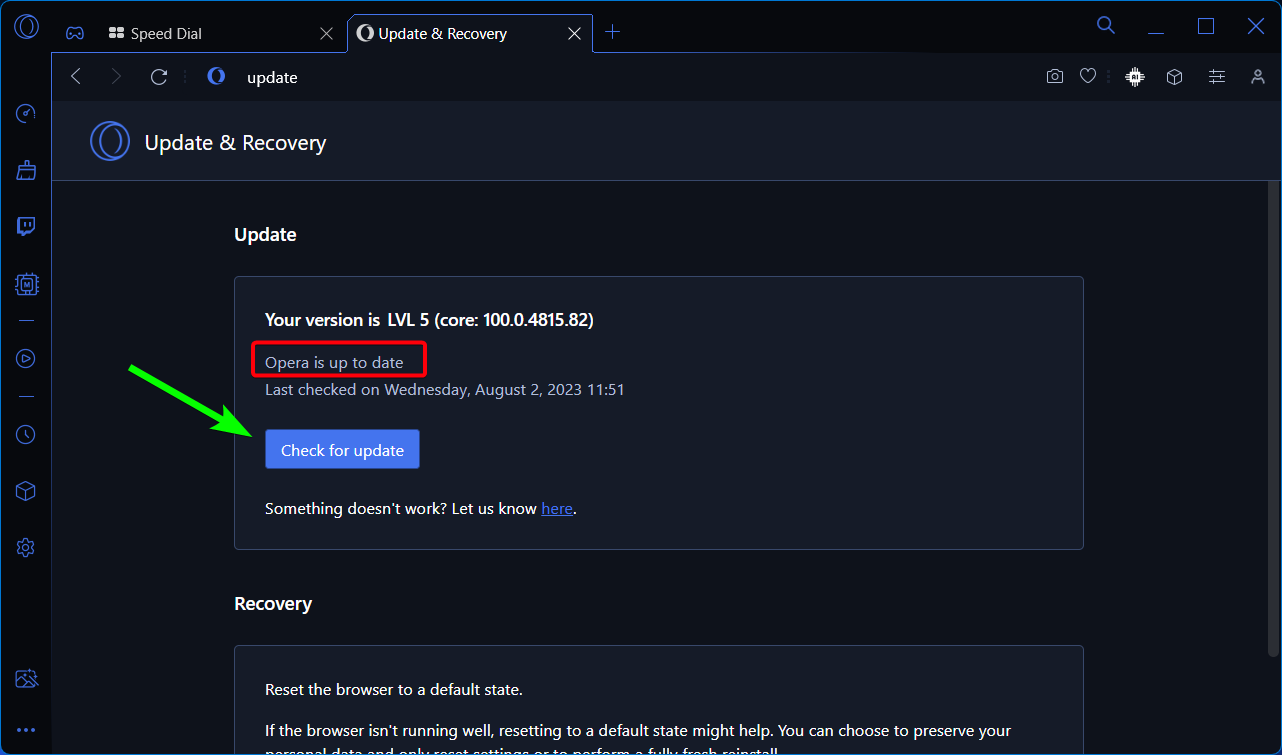
    Note that other browsers like Opera also offer this service for enhanced security. So, in case you’re also using that browser, you can enable DNS over HTTPS on Opera as well.

    How do I know if DNS over HTTPS is working in Firefox?

    So, you first want to check if DNS over HTTPS is already enabled on your Firefox browser. Well, it’s easier to check. While the Status of the DoH setting can tell the same, you can also follow these quick steps.

    1. Type “about:networking” in the Firefox address bar and press Enter.
    2. Click on the “DNS” tab.
    3. If you see ‘2’ below the DoH Mode, it means DoH is working in Firefox. If you see ‘5,’ it means the DoH is not working.

    Alternatively, enter https://1.1.1.1/help in Firefox’s address bar to verify if DoH is enabled and working properly.

    DNS over HTTPS connected

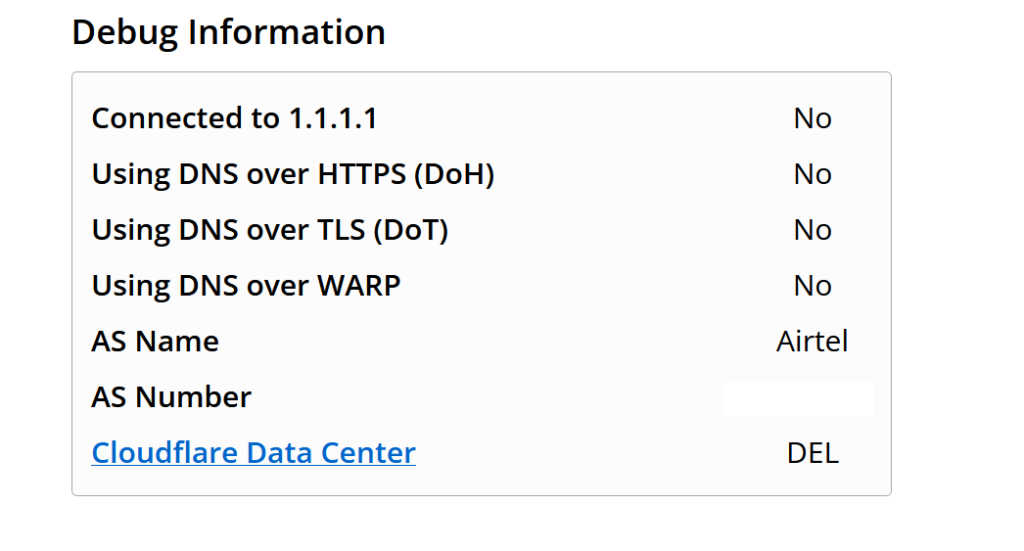
    This web page will also show you other important aspects.

    How do I enable DNS over HTTPS on Firefox?

    So, you have checked that the DoH feature is not already enabled on Firefox and now you want to enable it after knowing the advantages of it. The guide will show you how you can enable DNS over HTTPS on Firefox and unlock enhanced protection when you’re browsing.

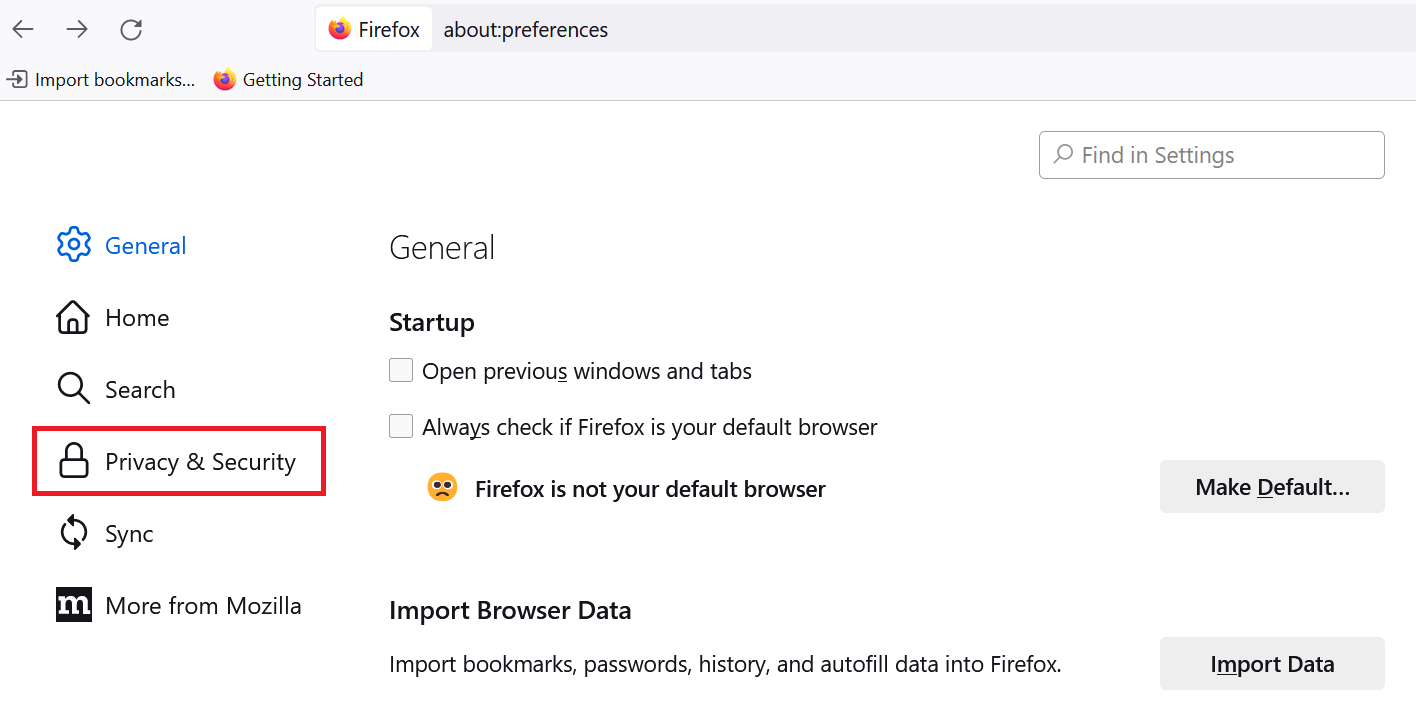
    1. In Firefox on Windows 11, go to Settings OR type about:preferences in the address bar.
      Firefox settings page
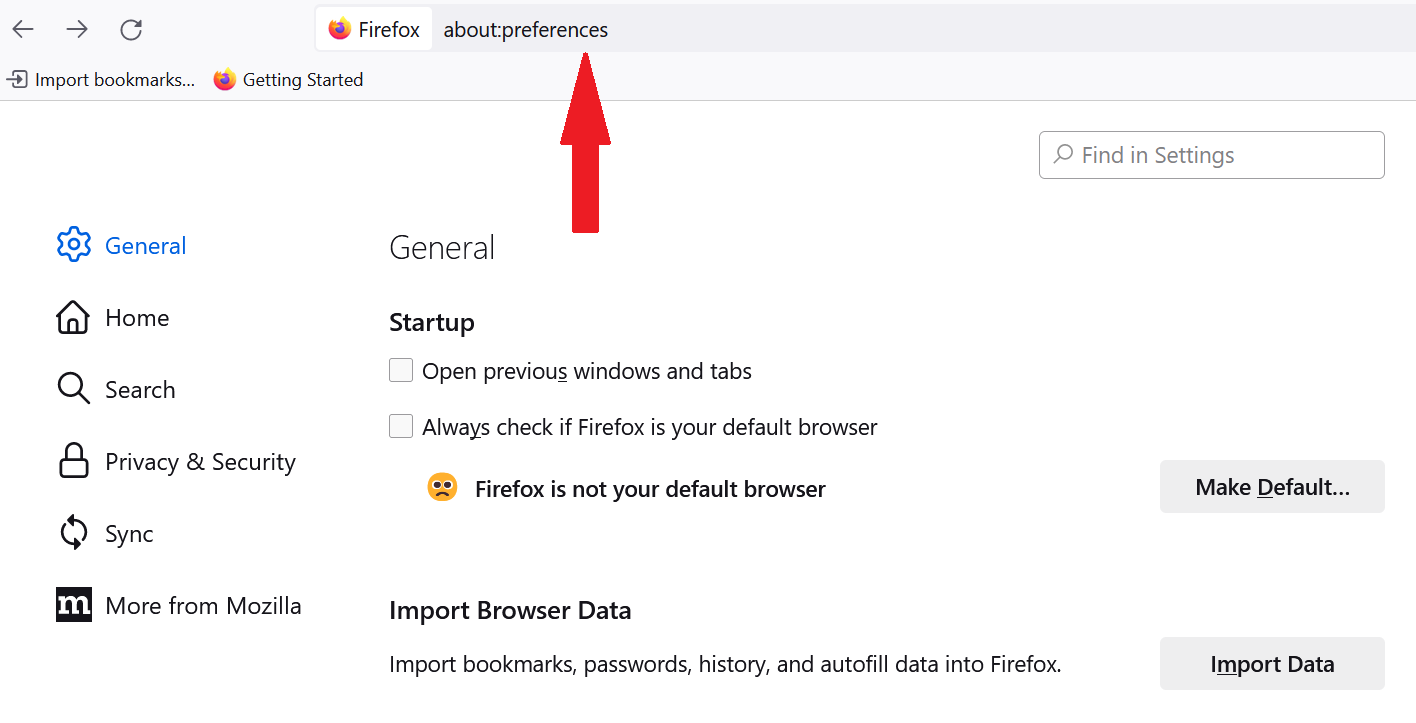
    2. Choose Privacy & Security.
      Firefox Privacy & Security
    3. Scroll down until you find “DNS over HTTPS”
    4. By default, Firefox has chosen the first way of protection, where it decides when to use DNS.
      Enable DNS over HTTPS in Firefox

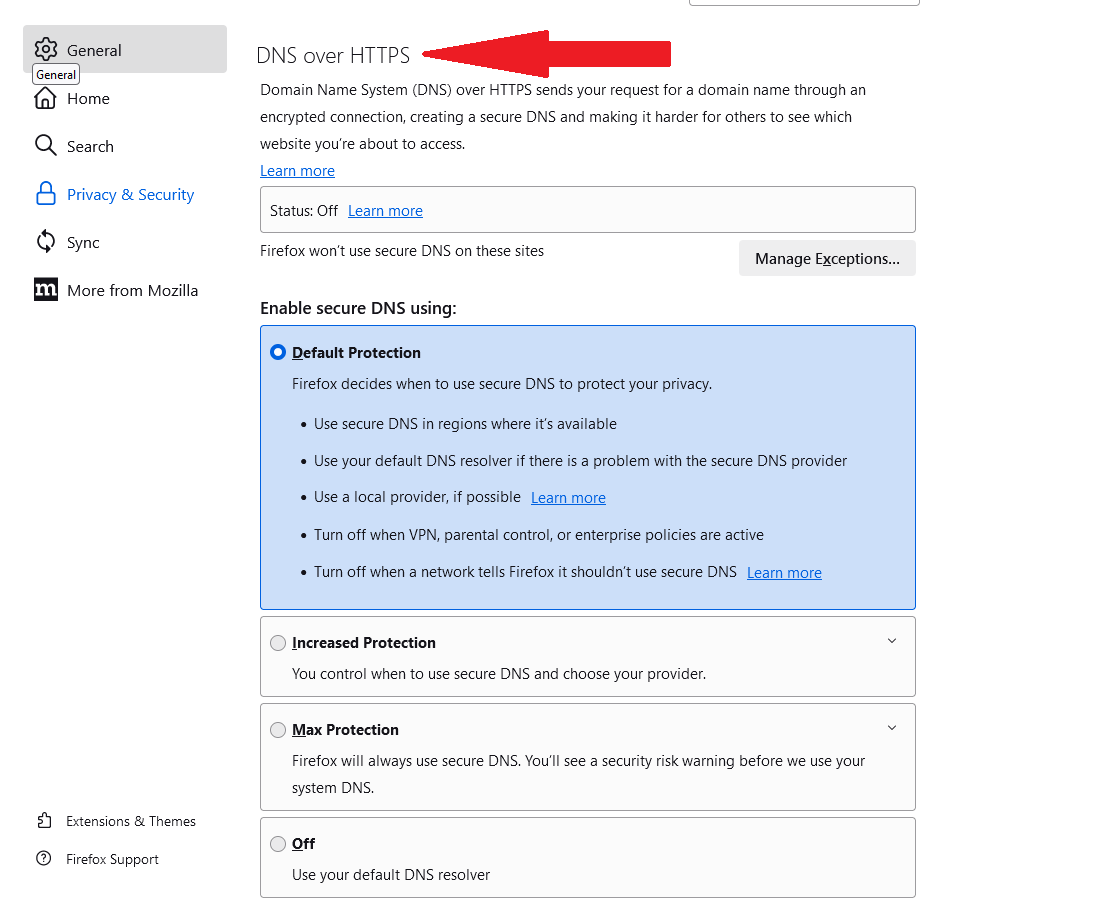
    The other three protection level includes ‘Increased Protection,’ ‘Max Protection,’ and ‘Off.’

    To turn DNS over HTTPS in Firefox, enable either of these two options. As soon as you select any one of them, Firefox will change the status to ‘Active.’

    If the status shows ‘Active,’ it means your DNS requests are wrapped inside the HTTPS protocol to ensure that the requests cannot be intercepted via a Man in the Middle (MITM) attack.

    If the status shows ‘Not Active,’ it depicts certain network conditions like VPN, parental controls, and enterprise policies that have directed Firefox not to use DoH. And, ‘Off’ is self-explanatory.  

    How do I turn off DNS over HTTPS in Firefox?

    First off, it is recommended to turn on the DNS over HTTPS setting in Firefox to safeguard yourself from potential risks. However, there could be reasons why you need to turn it off. For instance, a network is telling Firefox not to use DNS requests because certain websites are inaccessible.

    Furthermore, some organizations have their own secure DNS and they will ask Firefox not to bypass it. Additionally, some users may prefer to use their ISP’s DNS servers for faster and more reliable resolution of domain names.

    Another possibility that you want to disable DNS over HTTPS in Firefox is that it’s interfering with certain services or applications that rely on DNS resolution. Therefore, you should only enable it if you fully understand the implications.

    Simply select ‘Off’ from the list of options to turn off Firefox’s default DoH service.

    Can I use custom DNS providers with DoH in Firefox?

    Yes, you can use custom DNS providers in Firefox. By default, Firefox uses Cloudflare as its DoH provider, but you can change this to a custom provider of your choice. You can use NextDNS and other providers that are partners with Mozilla and follow the DoH resolver policy.

    Other DNS providers are satisfied as partners for Mozilla’s Trusted Recursive Resolver (TRR) program. As per Mozilla, it is open to adding more DNS providers as long as they meet a list of requirements.

    Here’s how you can change the default DoH provider on Firefox –

    1. Select “Increased Protection” from the list.
    2. Open the drop-down under “Choose provider”
    3. Select custom.
      Turn on DNS over HTTPS in Firefox browser

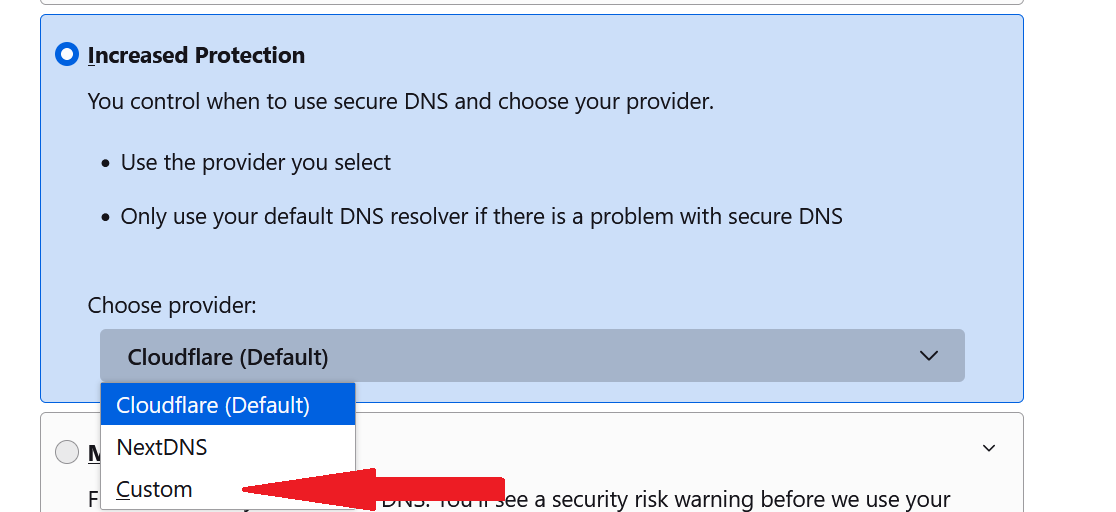
    To use a custom DoH provider in Firefox, you need to know the provider’s DoH endpoint URL.

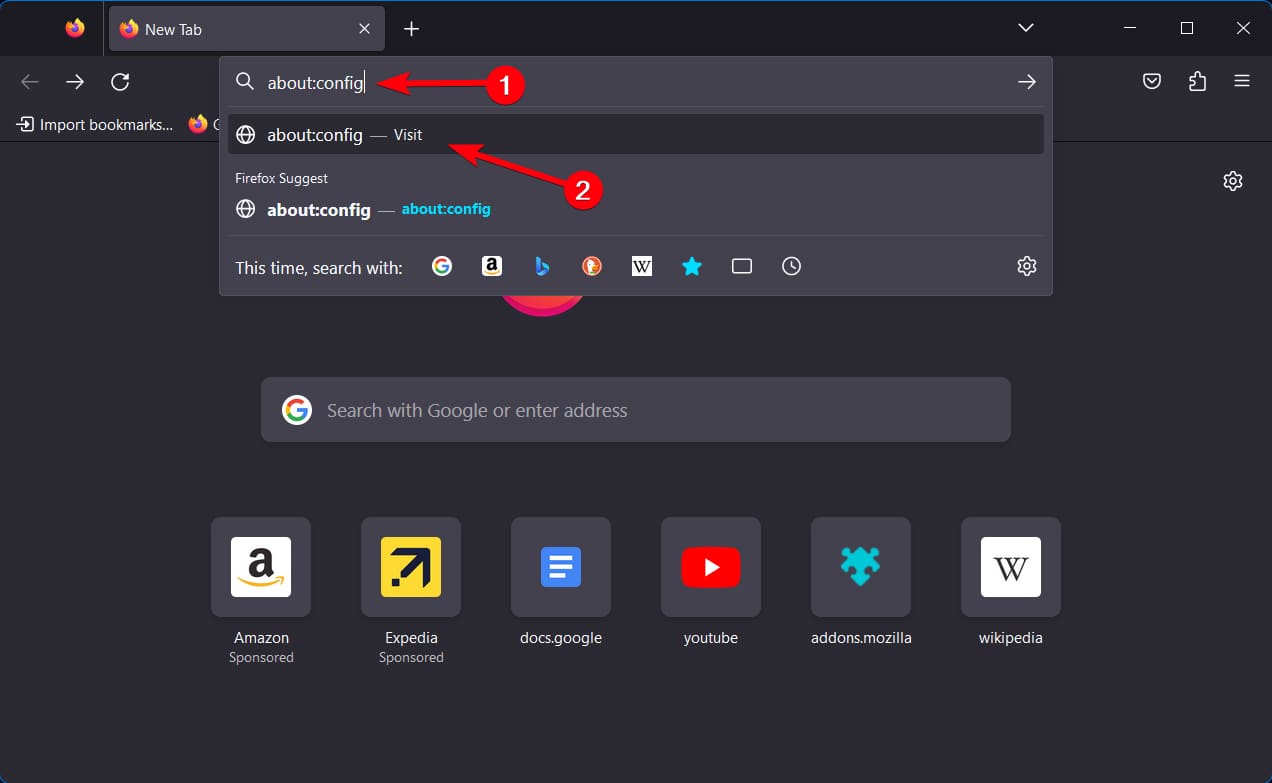
    Furthermore, every DNS provider provides a configuration guide that you can follow to add them to Firefox using “about:config” panel. So, it’s recommended to go by those instructions.

  • Opera GX VPN not working? Try these fixes now!

    Opera GX VPN not working? Try these fixes now!

    Opera GX, a special version designed specifically for gamers can encounter several stumbling blocks like VPN not working issues. It’s imperative to get rid of these connectivity issues to continue your private browsing.

    Opera GX has a free VPN that one can enable with a mere click. The makers added the feature to enhance user privacy and security while browsing the internet. VPNs encrypt internet traffic and hide the user’s IP address, making it difficult for third parties to track their online activities.  

    Secondly, VPN helps to bypass geo-restrictions and lets you access region-locked content.

    You can troubleshoot VPN issues on Opera GX on your own. We can assist you in navigating the process of maintaining your anonymity while using the internet.

    Apart from a built-in VPN, Opera GX comes with an adblocker, AI features, a password manager, and much more.

    You should consider making Opera GX your default browser for quick access to web applications in case you’ve already been using it for a while.

     Opera GX

    Opera GX

    Enjoy the free VPN feature on the Opera GX browser.

    Why is my Opera GX VPN not working?

    There can be many potential reasons why the VPN on Opera GX has stopped working properly. However, the most common underlying reason could be staying connected to the VPN over time. Other times, you might be having difficulty connecting to the VPN.

    Well, the possible issues related to VPN not working on Opera GX could be anything. You can always troubleshoot to know the root cause and apply fixes.

    Opera GX’s free VPN lets you connect to three continents mainly – the Americas, Asia, and Europe. By default, it chooses an optimum location. For starters, you can shuffle between these three provided locations to get your VPN back to work.

    And, if the primary solution doesn’t seem to work, you can always follow the below troubleshooting guide to fix Opera GX VPN issues.

    How do I get a VPN to work on Opera GX?

    Fixing VPN connecting issues could be tricky as you never know what triggered the problem in the first place. Nevertheless, the goal is to bring the virtual connection back to work and continue private browsing.

    Here are some troubleshooting tips and fixes that you can use to resolve common VPN-related problems.

    Check internet connection

    The first and foremost fix is to check that you’re on a stable and reliable internet connection. A weak connection is often the main cause of interruptions in establishing a VPN connection.

    Restart the VPN and browser

    Another solution that you should try first is to restart the VPN and browser. Firstly, cancel the connection attempt. Restart your browser and then reconnect to the VPN. More often than not the VPN connectivity issue is tied to this. So, it’s better to use the primary fixes first before jumping on to the bigger ones.

    Try a different server location

    Opera GX VPN not working

    Another fix that you can try to reconnect Opera GX VPN is by simply switching to another server. It is possible that you might be encountering a VPN connectivity issue with a particular server of the available location.

    Reasons could be anything, sometimes, servers are taken offline for maintenance. It’s also possible that the server you’re trying to connect to is under heavy load.

    Another obvious reason is the server you’re getting connected to is far from your physical location, hence the slower speeds. So, it’s better to switch. You can choose between a server in the Americas, Asia, or Europe.

    Clear browser cache and cookies

    One of the main reasons that your VPN keeps on disconnecting is because of the stored caches. Caches can interrupt a VPN connection by storing outdated or incorrect information about the VPN server or client.

    So, go to the left sidebar of the browser click the “Privacy & Security” section, and then tap on the ‘Clear browsing data’ option to clear caches and cookies.

    Opera GX clear caches

    Update Opera GX and resolve the VPN connectivity issue

    You should also update Opera GX to the latest available version because it’s possible that the VPN connection issue is tied to an older version of the browser. An outdated browser or software can invite many vulnerabilities that can make it more unstable and hence unable to be used.

    Disable other VPN software/ extensions

    Needless to mention, if you have any third-party VPN extension installed on your Opera GX then you have to disable it. This is because it might conflict with Opera GX’s built-in VPN. Also, uninstall any other VPN software installed on your system.

    Disable firewall or antivirus software

    One of the main causes that may interfere with the VPN connection is firewall or antivirus software. Disable them and check if the issue is resolved. However, enable them back once you’re done with your VPN session.

    Here’s how you can disable the firewall on Windows 11.

    1. Open Settings go to Privacy & Security and select Windows Security  > Firewall & Network Protection.
    2. Select a network profile: Domain networkPrivate network, or Public network.
      Alternatively, you can type ‘Control panel’ on the Start and search for ‘Firewall’ for quick access.
      Windows firewall
    3. Under Microsoft Defender Firewall, switch the setting off (if it’s On already).
      Note that turning off the Microsoft Defender Firewall could make your device (and network, if you have one) more vulnerable to unauthorized access.

    Note: It’s possible that you may not be able to access popular video streaming sites like Netflix. This is not an issue of Opera GX. The streaming site has geo-restriction block mechanisms in place and the browsers can’t bypass them.

    Also, unlike standalone VPN software that we install on our Windows system, Opera GX’s built-in VPN is easy to solve. You just have to solve the troubleshooting guide to get the private browsing back to work.

  • How to View Firefox Saved Passwords and Manage them

    How to View Firefox Saved Passwords and Manage them

    Firefox lets you save your passwords so that you don’t have to type them manually the next time you’re logging in. Its password manager is pretty simple to use. It can automatically fill in login details for quick access, lets you find your saved passwords and much more.

    Firefox is known for its fast performance and strong security features. Like others, the browser goes through some stumbling blocks like pages not loading up, tabs crashing, or battery drain issue as well. However, it’s easier to downgrade Firefox to the previous version or try other fixes to restore everything.

    The browser gives you many features and password management is one of them, where it stores all your logins and lets you manage them. It’s totally in the users’ hands whether they want to enable saved logins for websites.

    Once saved, you can view saved passwords on Firefox, copy and delete them, and sync logins as well. Also, it’s pretty safe to save passwords in Firefox, provided you’re using a primary password.

    Let’s dive into the guide and know how you can view your saved passwords in Firefox and manage them further.

    Is it safe to save passwords with Firefox?

    Firefox’s built-in password manager has been designed to be secure and encrypted, so it’s generally safe to save passwords in Firefox. However, for extra security, Firefox lets you set a primary password as your master password to further give a shield to your saved passwords.

    It’s recommended to set a primary password in case other people also use your system. If a primary password is not set, anyone can look into your saved passwords and get access to those sites.

    By default, the feature is disabled, but one can enable it and set a password.

    Setting a primary password on Firefox not only protects your passwords but also helps in managing them. It helps in syncing and exporting passwords across different devices.

    1. Go to Settings and select Privacy & Security.
    2. Scroll down until you see Logins and Passwords section.
      Firefox logins and passwords
    3. Just check the option that reads “Use a Primary Password.”
    4. A new window will open where you’d need to set up the primary password.
      Set primary password to view saved password in Firefox

    So, this is how you protect your saved passwords in Firefox.

    Primary password set on Firefox

    Once the primary password is set, Firefox will ask you to enter it every time you’re viewing your saved login credentials or doing other things using its password manager.

    How do I view my saved passwords in Firefox?

    So, you’ve saved your login credentials with Firefox and now you want to know where your logins are stored! Well, it’s pretty easy to locate your saved passwords. Just follow the below instructions to have a look at your stored passwords.

    1. On Windows, visit Settings, and go to Logins and Passwords section, and select Saved Logins.
      Firefox view saved logins
    2. Open the Firefox menu on the top right and select Passwords.
    3. If you’ve set up a Primary Password, you’ll be prompted to enter it before viewing your passwords.
    4. After this step, you’ll be able to see all of your saved logins in a list.

    You may also see icons next to a website login. For instance, a list of breached websites above the other saved sites.

    On Android, tap the Menu button and select Settings. Choose Logins and Passwords, and pick Saved logins. Select one to view the details.

    View Firefox saved passwords on Android

    How can I manage passwords in Firefox?

    Managing passwords in Firefox is simple. You can delete your saved passwords if you don’t want the browser to remember them any further.

    Firefox’s built-in password manager lets you remove all your saved logins in just one go. “Remove All Logins” delete all the logins in a click. However, you can also choose to edit and delete specific passwords for saved sites.

    You can also export your saved usernames and passwords in a .csv file and move them to a different application.

    You can also turn on sync on Firefox so that you can use your stored passwords across all devices. The sync feature also lets you sync other data such as bookmarks, history, passwords, open tabs, and installed add-ons. You can also fix syncing issues if Firefox is throwing any.

  • Change Opera GX Browser sounds of your choice

    Change Opera GX Browser sounds of your choice

    Opera GX offers tons of customization options to elevate your browsing experience. You can try out different mods and even change browser sounds to add a personal touch to your daily driver.

    Customizing browser sounds is pretty easy as you just have to adjust the settings. This means that you can choose your preferred notification sounds and adjust the volume to your liking.

    You can change typing sounds, adjust the volume, and disable them completely. The browser lets you manage even the smallest things for that tailor-made experience so that the browsing doesn’t feel dull.

    Apart from personalization options, the Opera GX gaming browser lets you manage passwords, organize bookmarks, and try some AI prompts to boost your productivity. You can set Opera GX as your default browser if you have been enjoying using it.

    Opera GX

    Opera GX

    Opera GX lets you customize the look and feel of the browser so that you enjoy personalization.

    So, let’s dive into the guide on how you can manage different sound profiles on the Opera GX browser.

    Can I set different sounds for different events on Opera GX?

    Yes, Opera GX lets you set different browser sounds for different things. For instance, you can change typing sounds, and how it should sound when you click on something, hover over, open a tab, close a tab, or simply switch.

    The browser offers different tracks for every event you do. You can adjust the volume as well. 

    By default, the background sound is turned off on the browser. You can enable the background sound if you would like to add some lively ambiance while your browse. Just configure it further by going into the settings. You can choose from different tracks available in the settings.

    Additionally, install mods from the mod store in case you don’t like the available tracks for background music.

    How do I manage browser sounds in Opera GX?

    Changing browser sounds on Opera GX is super simple. You just have to adjust a few settings to manage specific sounds. For now, the browser settings do not offer tracks for clicking and other events. However, a third-party mode can change the entire track for you.

    So, let’s follow the step-by-step guide on how you can set custom sounds on Opera GX.

    Change typing sound in Opera GX

    1. Go to Easy setup, which is three horizontal lines in the top-right corner of the browser.
    2. Scroll down to find Browser sounds under the Features panel. By default, the toggle is switched ON.
      Change browser sounds Opera GX
    3. Click on Configurations to launch the settings.
    4. Browser sounds Settings page will open. The first setting is ‘Typing.’ You can choose from two sets of sounds and adjust the volume as well.
      Change custom browser sounds on Opera GX

    Alternatively, you can go to Settings from the settings provided in the left sidebar and search “music” to launch browser sound settings.

    You can click on the ‘Get more’ option provided above the sound profiles to choose more keyboard sounds.
    Mods to change background sound in Opera GX browser
    Clicking on the ‘Get more’ will open the Mods store from where you can choose to install custom sounds.

    The moment you install any background music mod, it will get changed right away.

    Take, for instance, we have selected LoFi Chill mod here. This is a mod, which means it includes combinations of different personalization options.

    LoFi Chill mod

    It can change background music as well as browser sounds all at once. This mod changes keyboard sounds, wallpapers, browser sounds, and themes as well.

    All the Browser sounds settings will show “Modded” beside them. Clicking any one of them navigates you to the installed mods page.

    Opera GX browser sounds

    Changing the volume is easy as well. You can see a volume bar beside every browser sound. You just have to adjust the volume.

    So, this is how you manage sounds on the Opera GX browser.

    How do I disable browser sounds in Opera GX?

    You can turn browser sounds off on Opera GX if you don’t want the browser to make sounds while you’re hovering over something, typing, clicking, or flipping switches.

    1. Go to Easy setup
    2. Scroll down to find Browser sounds under the Features panel. Toggle the switch off and the browser will stop making any sounds.

    Similarly, you can turn off the background sound on Opera GX. Follow the same path and just toggle the switch off.

  • Fix: Microsoft Edge Dark Mode Not Working issue

    Fix: Microsoft Edge Dark Mode Not Working issue

    So, you were enjoying dark mode on Microsoft Edge but somehow it’s not working and you need a quick fix so that you could go back to your personalized settings. Well, fret not as it’s pretty easy to bring back the Microsoft Edge dark mode.

    Microsoft Edge browser lets you enable dark mode easily using settings, just the way it allows other customization things like ADMX templates to personalize your browser experience.

    Dark Mode is nothing but a mere cosmetic change that alters the appearance of your browser. It changes the background color of your homepage, toolbar, settings, and even web pages you visit to black or dark grey.

    Dark Mode saves the battery, and reduces eye strain and fatigue, especially when using devices for extended periods.

    Alternatively, you can bypass all the fixes and choose a different browser altogether. Opera is one such browser that also offers customizations.

    Opera Browser

    Opera Browser

    Try the new Opera instead and explore new features and customizations!

    Why is my Microsoft Edge Dark Mode not working?

    Before we dive into the solutions to Microsoft Edge Dark Mode not working issue, let’s know first why the setting has stopped working for you.

    Well, there can be several reasons why the Dark Mode is malfunctioning on the Microsoft Edge browser. We are enlisting a few of them here.

    1. Bug in the browser.
    2. Outdated browser version.
    3. Incorrect Settings – browser is set to switch to light mode automatically based on the time of the day.
    4. Bad user experience due to stored caches with outdated or corrupted data.

    While the dark mode is available on all versions of the browser, it’s still possible to experience certain malfunctioning. Take, for instance, you have turned on dark mode on Edge browser but some websites aren’t turning dark.

    Microsoft is also experimenting with a darker mode on Edge, which should arrive soon.

    How do I fix dark mode not working properly on Microsoft Edge?

    We are enlisting the top 5 fixes for the Microsoft Edge Dark Mode issue on Windows 11. You can implement them and check if it starts working again.

    Update/Reset

    One of the main methods you can implement to bring the dark mode back to working is updating Edge to the latest version. Most of the problems are tied to an older version of browsers. So, it’s better to stay on the updated version and keep bugs at a distance.

    To update – Go to Settings and look for About Microsoft Edge. A new page will open that will tell if your browser is up to date. If the About page shows An update is available. Select Download and Install to proceed.
    Microsoft Edge browser update
    To Repair – Alternatively, you can also try to repair or reset the Edge to get things back to work. Follow this path – Settings > Apps > Installed Apps > Microsoft Edge > three-dot menu > Modify.

    It’s worth mentioning that resetting Microsoft Edge clears all data and browsing history. It also disables any installed extensions. So, take a backup if you don’t want your data to vanish.

    Force Dark Mode

    Another common method to fix the dark theme setting not working issue is to simply force the setting on Microsoft Edge. Again, you have to be on one of the latest versions of Microsoft Edge to bring the feature back.

    Microsoft lets you enable some of the features via its edge://flags settings page. You just have to look for the right setting. For instance, here in this case, you can find the dark mode setting by entering edge://flags/#enable-force-dark into the address bar of Microsoft Edge.

    So, follow the steps –

    1. Enter edge://flags/#enable-force-dark into the address bar.
    2. The flag will pull up the “Auto Dark Mode for Web Contents” setting by highlighting it.  
    3. Click on the drop-down menu next to the setting and select “Enabled.”
      Microsoft Edge Dark mode not working flag
    4. Click Restart in the lower right corner to apply all the changes.

    Note that this feature made its way with Microsoft Edge v84. So, make sure you’re using this version or above.

    Windows Color Settings

    If Microsoft Edge settings didn’t work out for you, try enabling the dark mode by going into the Windows color settings. However, the change will also affect all Universal Windows Platform (UWP) apps into dark mode instead of just Edge.

    1. Go to Windows Settings or press Windows+I key combinations
    2. Select Personalization
    3. Tap on the Colors tab
      Microsoft Edge Dark Mode not working fix
    4. Under Choose your mode, select Dark.
      Microsoft Edge Dark Mode not functioning fix

    Restart your PC if the applied settings don’t seem to work.

    Time Zone Setting

    You will need to check whether the Time Zone is correct if you’re using the Custom Color Mode feature on your Windows 11 PC,

    1. Go to Settings
    2. Click on Time and Language
    3. Select the Date and Time
      Microsoft Edge Dark Mode not working issue
    4. Click on the toggle next to Set Time Automatically turned on.
    5. Under Additional Settings, click on Sync Now button.
      Microsoft Edge not working issue
    6. Close the window and open Edge to check if the problem is solved.

    Use Extensions

    Interestingly, you can install a third-party extension if nothing seems to work, and switching to a completely new browser looks too much.

    You can install extensions like Dark Reader to enable dark themes on all the websites you visit on Microsoft Edge. However, you may not see the changes on the toolbar.

    You can also adjust the brightness and contrast of the web pages using the Dark Reader extension.

    To enter into the extension –

    1. First off, add the extension to the toolbar for quick access.
    2. Click on the Extensions icon provided on the toolbar.
    3. A list of installed extensions will open. Click on the eye icon next to the Dark Reader extension to view it on the toolbar.
    4. Now, click on the Dark Reader extension to open the menu.
      Dark Reader extension
    5. Toggle On or Off. Choose between Dark and Light.

    You can tweak more settings and play around.

    There are many other extensions available on Microsoft Edge that can help you enjoy dark themes on the browser. Just write dark mode in the search box on the Microsoft Edge Add-ons page and select the ones based on the latest updates and reviews.

    It’s worth mentioning an extension might affect page loading speed on the Edge browser.

    So, these were the methods using which you can make dark mode work again on Microsoft Edge. Let us know which method worked for you.

  • How to Add Custom Notes to Site Passwords in Chrome

    How to Add Custom Notes to Site Passwords in Chrome

    You can now add notes to your site passwords in Chrome to remember important details related to that particular account. Up until now, you might have used third-party extensions to get things done. But, it’s better that Chrome’s password manager now has a built-in note-taking feature as well.

    It is one of the new ways of managing passwords using password manager on the Chrome browser with the help of which you can safely annotate site passwords. You can add custom notes like when did you last update your account on that particular site.

    While using a password manager on any browser takes care of your logins, it’s still better to add notes for password recovery. You can also add special instructions or requirements to the notes for seamless logins.

    The feature can prove to be super helpful for sites with confusing names. You can just make a note like why did you make an account on the site or did you find something important on the site.

    Well, there can be many other useful scenarios. So let’s dive straight into how you can create notes to passwords stored on the Chrome browser.

    Can you add notes to Chrome passwords?

    Yes, you surely can! Google Chrome now natively supports a note-taking feature for your saved passwords. It is more like adding comments to your password entries so that you could know more details about the sites.

    It’s another way of adding a touch of personalization while you customize Chrome browser your way. Among several other functionalities like grouping tabs, hiding bookmarks in incognito, and disabling journeys, the note-taking feature is surely a nice addition to your customization.

    We visit dozens of websites and a note beside the stored password can help you save your time. You can quickly find out why did you visit that particular site in the past.

    How do I add notes to saved passwords on Chrome?

    Adding notes to saved passwords in Chrome is simple. You just have to log in to your master account to manage passwords.

    Follow the below guide and know how you can put notes on the saved passwords.

    1. Go to the horizontal lines menu provided at the top-right corner of the Chrome toolbar.
    2. Click on “Google Password Manager.”
    3. You will then see the list of saved passwords for the sites you have visited in the past.

      Adding notes to saved passwords using Password Manager
    4. Tap on any website in order to create a note.
    5. A new window “Windows Security” will open where you need to enter your password/pin to proceed further.

      Windows Security window in password manager
    6. Once you log in to your main Windows account, you will see your Username, Password, site name, and a text box to make a note.

      Create notes for saved passwords in Chrome
    7. Click on the Edit button provided below to edit the Note section.
    8. Another window will open where you will make a note and then click Save to create a note.

      Add notes to site saved passwords in Chrome

    And, this is how you add password-protected notes in Chrome browser on Windows desktop. Follow the same steps in case you’re using an Android phone. But here’s a quick rundown.

    1. Open Chrome on your Android device.
    2. Tap the three-dot menu in the top corner.
    3. Select Settings.
    4. Select Password Manager.
    5. Tap on any saved site password.
    6. After verifying your identity, tap Edit.
    7. Write a note in the text box and hit Save.

    Note: You can access password-protected notes on different devices as well. To do so, make sure syncing is enabled in Chrome Settings.

    Can I use a Chrome extension to add password-protected Notes?

    It’s possible that you like third-party extensions more because they offer more. For instance, AI Chrome extensions are on the rise these days as they help you supercharge your productivity.

    Third-party password manager extensions do offer additional features as well and there are many extensions that help you make notes for your saved passwords. But, we are suggesting only a couple of extensions that are free to install on the Chrome browser.

    1. LastPass – It is a popular third-party extension on Chrome that lets you add notes to your stored passwords. It’s more than a password manager which offers various useful features as well.
    2. BitWarden – It’s another widely known password manager extension on Chrome that offers a note-taking feature. You can make notes for your password entries on the browser while keeping a check on your security.

    Well, you must give a try to Chrome’s new feature of Password Manager before using an extension. Let us know what type of notes you are adding to your saved passwords on the Chrome browser.

  • How to Easily Downgrade Firefox to a Previous Version

    How to Easily Downgrade Firefox to a Previous Version

    It is certainly possible to downgrade Firefox to a previous version safely. Well, there can be many reasons why you want to do so. You might be facing some issues with the new build or you simply don’t like the new UI changes.

    The guide to restoring the previous version of the browser is simple. Just download the older build, install it, and enjoy your browsing. But, you will also need to disable the automatic updates so that you could avoid upgrading to the newest build in the future. However, it’s not officially recommended.

    Mozilla Firefox is one of the privacy-centric browsers which offers enhanced tracking protection, private browsing, anti-phishing protection, and more. But you wish to stay on the older build because Firefox is not loading pages after the update and is throwing issues like screen tearing, Tabs crashing, or simply cosmetic changes like border-radius not working issue.

    Alternatively, you can also switch to a completely new browser like Opera if you think Firefox is throwing troubles or even downgrading isn’t helpful. It’s faster, reliable, and includes so many built-in features like VPN and adblocker.

     Opera

    Opera

    Ready for a Change? Opera is the smart choice for a more efficient browsing experience!
    Download Install Now

    Can we downgrade the Firefox version?

    Yes, you can degrade the current version of the Firefox browser to an older one. There can be several reasons why one would want to roll back.

    • New UI changes aren’t really welcome.
    • Compatibility issues.
    • The older version works better with add-ons.
    • The new build is throwing troubles like any specific website isn’t opening.
    • Unwanted new features.

    It’s worth mentioning that you can revert to an older version of Firefox but it’s not recommended. Mozilla clearly states on its support page that downgrading to an older version can invite unknown vulnerabilities.

    The developers do not support the older versions so you will be left with an insecure version.

    How do I download an older version of Firefox?

    Going back to a previous version of Firefox is easy. You just have to go to the directory of Firefox builds and download the version.

    Below you can find detailed instructions on how you can download the older build and install it on your Windows system.

    1. Go to the Firefox repository of older builds and releases. You will find many builds, some even dating back to 5-6 years. But don’t choose the oldest ones as they can invite scams and risks.

      Downgrade Firefox to previous version
    2. Click on the version you wish to download. Here, we are taking the example of version 114.
    3. Next up, choose the right system architecture – 32-bit or 64-bit that matches your Windows system.

      Firefox previous version
    4. In case you don’t know how to check the system architecture, then tap on the Menu button, provided at the top-right corner of the Firefox toolbar. Click on Help and select About Firefox.

      A new window will open that will tell you the system architecture.
      Firefox browser version
    5. Choose the language and region.

      Firefox older version 32-bit
    6. Finally, download the .exe file of the build.
      Firefox older version 64-bit

    This is how you successfully download the older Firefox version on your system.

    How do I install the older Firefox version?

    Now that you have downloaded the previous version of Firefox on your Windows device, it’s time to install the version.

    Follow the below steps in order to roll back to the previous version of Mozilla Firefox. Before following the installation guide, make sure to uninstall the latest version of Firefox from your system.

    1. Double-click on the downloaded Firefox Installer .exe file and follow the wizard.
    2. Set up window will open with options Standard and Custom. By default, the Standard option is selected. Click Next.
      Firefox older version installation
    3. Select the location where you want to install the Firefox older version.
    4. Once you select the location, Firefox will ask for your confirmation.

    You can check the update version by going into the Help section under Settings.

    Firefox older version successfully installed

    Once you have installed the older version, Firefox will show you this warning. Click on ‘Create New Profile’ in order to get started.

    Firefox older version installation

    Important – Here is one crucial step while installing an older version of the browser. You have to disable auto-updates first, otherwise, Firefox will download to the latest version automatically.

    How to disable auto updates?

    Go to the Menu provided on the top-right corner of the Firefox toolbar, select Settings, and under General Settings scroll down to find Firefox Updates option. Deselect Automatic installed updates and select “Check for updates but let you choose to install them.”

    Disable automatic updates on Firefox

    While this option will look for the newest updates, it will not install them without your confirmation.

    Can I keep my bookmarks and settings when downgrading Firefox?

    Downgrading to a previous version of Firefox doesn’t affect your bookmarks. You can revert to a previous version of Firefox by keeping your profile intact.

    However, it’s still recommended to back up your bookmarks and settings before downgrading to avoid any kind of mishap.

    Here’s how you can do it –

    1. Open Firefox and click on the “Bookmarks” menu.
    2. Click on Manage Bookmarks or press Ctrl+Shift+O
    3. In the Library window, click on “Import and backup” and select “Backup…”
    4. Choose a location to save the backup .json file and click “Save.”
    5. To restore your bookmarks and settings after downgrading, follow the same steps but select “Restore” instead of “Backup.”

    So, this was a simple guide on how you can downgrade Firefox to your favorite version. If the problem still persists, you can uninstall this version and try any other recent version from the directory and follow the steps again.

    Alternatively, Mozilla also suggests that some problems can be solved with the help of the Firefox Refresh feature. it restores the browser to the default state while saving the essential information. This also comes as an alert while uninstalling the browser.

    Firefox Refresh feature


    Let us know in the comments if you are able to roll back.

  • How To Deny Website Access to Clipboard on Browsers

    How To Deny Website Access to Clipboard on Browsers

    You don’t need any technical knowledge to block clipboard access on popular browsers like Chrome or Opera. The process is simple and straightforward. You just have to tweak one simple browser setting in order to prevent the clipboard access on the browser.

    You might have encountered a message like “Do you want this website to access your clipboard?” This is when a website asks for permission. However, not every Chromium-based browser asks for this clipboard permission.

    Google Chrome, for example, can read copied information if you’re allowing it. A website can take your browser’s clipboard and read the sensitive content. In addition, desktop users may use the clipboard option to temporarily store the information. Take for instance, when entering a password or pasting a text from a site to a search engine.

    Chrome has multiple settings such as the autofill option that risk the leak of your sensitive information. This is when you have to protect your clipboard from malicious websites.

    How do I know if a website is accessing my clipboard?

    It’s better to block websites from reading or modifying your clipboard. But, how can you detect it? Well, there are some tips to protect your clipboard:

    1. Browser settings – There is a browser setting you need to configure in order to disable websites from accessing your clipboard. It’s also worth mentioning that most secure browsers notify you whenever you’re visiting a new website.
    2. Developer Tools – You can tap on Developer Tools and look for the “Network” tab and look for the requests with the type “Clipboard.”
    3. Install Clipboard Manager – You can install an extension that will monitor clipboard activity.
    4. Using an Antivirus – Some smart antivirus software can also detect and block access to your clipboard by websites. They keep logs of which websites users are browsing.

    So, in case you had allowed websites to access your clipboard before, you can simply delete the clipboard history as well. Just go to your browser’s settings and clear your browsing data.

    How do I turn off clipboard events in Chrome?

    Below is a quick way how to deny website access to the clipboard on the Chrome browser. The guide is simple to follow.

    1. Open a new window on Chrome and access any website.
    2. In the URL search bar, click on the locker icon.
    3. Click on the last option called Site Settings.
    4. Now, scroll down in the settings until you find Clipboard.
      Clipboard settings
    5. Click on the drop-down arrow to expand it and modify it.
    6. Select Block and click on the screen again, and then exit the settings.
      Block cliboard Chrome
    7. From now on, the clipboard events are not allowed in the browser.

    ?️ Note: You can selectively block websites from accessing the clipboard on Chrome. But, this feature may not be available on all web browsers. In the guide below, we’re showing you how to perform this on the most used browsers out there.

    You can also block third-party cookies on Chrome and surf the web privately.

    Deny website access to clipboard on Opera

    It’s recommended to use this browser solution for more private navigation and more flexibility regarding app integrations and AI-powered search. This is how to block websites from reading or modifying the clipboard on Opera.

    1. Launch the browser and open a window.
    2. Go to any webpage and select the locker icon, similar to Chrome.
    3. Click on the last option named Site Settings.
      select Opera site settings
    4. Scroll down in the settings until you find Clipboard.
      clipboard setting Opera
    5. Click on the drop-down arrow to expand it; and choose the Block option.
      clipboard block Opera
    6. Exit the Settings and verify if you can still copy information on the clipboard.

    Block clipboard access on Mozilla Firefox

    1. Open a Firefox browser tab and type about:config in the URL bar.
      type about config Firefox
    2. Click on Accept the Risk and Continue warning button.
      deny website access to clipboard on browser
    3. Search with a clipboard query to find the setting.
    4. Find the dom.event.clipboardevents.enabled option and select it.
    5. Press on the Toggle button on the right side and set it to False.
      block websites from accessing clipboard on Firefox
    6. Now, close the configuration page and navigate without clipboard access.

    From now on, painlessly use copy-paste function in Chrome or other browsers without the fear of exposing your data to malicious websites or third parties.

  • How to Easily Manage Bookmarks on Opera   Browser

    How to Easily Manage Bookmarks on Opera Browser

    If you want your bookmarks to be all organized and lined up in the browser, be sure you can fully personalize and manage bookmarks on Opera without any effort.

    Bookmarks help you save your favorite web pages and quickly access them whenever you want. There are numerous ways to organize your bookmarks in Opera. You can bookmark a web page, create folders, give your bookmark a new name, and organize them so you can view them later without being a lost wanderer.

    Opera focuses on browser customization, UX elements, and AI features. The browser lets you manage the bookmarks easily from the settings.

    You can save your bookmarks and access them from other browsers or devices, when you’re commuting, for example. There are bookmark exporting features to keep your favorites in one place.

    Opera One

    Opera One

    Take control of the digital bookmarks and organize them seamlessly with this revamped browser.

    Can you make bookmark folders in Opera?

    It is certainly possible. You can simply make bookmark folders in Opera by pressing the folder icon in the bookmarks settings. Once you created the folder, it will show up inside the Bookmarks Manager panel.

    So, next time you want to bookmark any web page, you just have to press the heart icon provided in the URL section.

    To create a bookmark folder. Press the heart icon in the URL of that webpage and Bookmark Manager will open up. While you’re still inside the Bookmark Bar, click on the Folder menu beside the Bookmark bar option to create a folder. Give your folder a name so that you could easily find it the next time you’re bookmarking a page.

    How do I organize bookmarks in the Opera browser?

    In the next part, we’re going to show some ways using which you can manage bookmarks in the Opera browser and organize your favorite web pages for quick access. Let’s get to it!

    1. Access your bookmarks on Opera

    1.1 From the browser sidebar

    1. Open a new tab in the browser.
    2. Now, hover the mouse cursor on the left side to see the sidebar.
      open Opera bookmarks
    3. Go to the heart icon and click on it.
    4. In the manager panel, click on the Bookmarks bar to expand all of them.
      sidebar bookmarks Opera

    2.2 From the navigation bar

    1. Click on the heart icon next to the URL bar.
      bookmark heart Opera
    2. After you bookmarked the website, the dialog box will appear.
      dialog box opera
    3. Select the View in Bookmarks button to open the tab.
    4. In this tab, select the Bookmarks option and to all your saved webpages
      bookmarks manager panel
    5. See the Speed Dial bookmarks or Other bookmarks folder below.

    2. Rename bookmarks in Opera

    1. Access the bookmarks from the sidebar panel.
    2. Go to the bookmarked website you want to rename and click the three dots.
      rename bookmarks
    3. Now, select the full text and rename it according to your needs.
      renamed bookmark
    4. Click wherever on the screen to save the changes.

    3. Import or export bookmarks

    1. Open the full bookmarks view from the sidebar option.
      Open the full bookmarks view
    2. In the full view, click on the Import/Export button below.
      Import Export button
    3. Choose Import or Export to start the process in the settings.
    4. Tick the boxes for bookmarks and press the Import button.
      import bookmark option
    5. Wait until all the information is transferred from another browser.
    6. Repeat the steps for the other process.

    4. Show and hide bookmarks in Opera

    1. Click on the equalizer button to open Easy Setup.
    2. Scroll down to find the Layout section and Show bookmark bar option.
    3. Toggle on/off depending on what you need to do.
    4. The bookmark bar will show on the top bar with all your websites.
      Show bookmark bar
    5. You can hide it by right-clicking on the top bar and Hide bookmarks bar.
      Hide bookmarks

    Now you know that the Opera browser gives you plenty of methods to easily organize and streamline your bookmarks. Not only that, it now offers some AI functionalities like AI prompts using which you can transform your search queries for better results.

    In the end, we wish that our guide proved helpful for your browsing needs on Opera and now you can bookmark and save your sites effortlessly. For other curiosities, you can always reach us in the comments section.

  • Why is my Opera GX Wallpaper Not Working?

    Why is my Opera GX Wallpaper Not Working?

    You customized your Opera GX browser with your favorite wallpaper but it’s not working anymore. The reason can be anything but you can resolve this issue and get back to enjoying the customization.

    Opera GX is a great browser that offers a lot of customization options. You can set up animated or live wallpaper and choose from a range of different designs, abstracts, landscapes, and a lot more.

    Also, if you’re a passionate gamer, you can choose Opera GX mods to elevate your gaming experience and fix mods not working issues in case you’re having some troubles already.

    Applying wallpaper on a browser isn’t a big task. You just have to choose your favorite one to personalize your browsing experience. But even this simple task can start causing trouble sometimes.

    Opera users have reported malfunctioning wallpapers. Sometimes, the homepage wallpapers go black, stop responding, or stop displaying entirely. But fret not! you can resolve these problems.

    Why has wallpaper stopped working on Opera GX?

    Well, the reasons why your custom wallpaper stopped working on the Opera GX browser are many. But you can troubleshoot the underlying issue and enjoy personalization once again!

    These are the main possibilities for your Opera GX live wallpaper not working problem:

    • Browser extension issues
    • Disabled wallpapers in the settings
    • The battery-saver option is interfering with the wallpapers
    • Corrupted cache or cookies data

    An unsupported operating system is also one of the issues that can stop wallpaper from working properly. Furthermore, so many background processes running in the background can cause wallpaper malfunction.

    So, now you do know what’s stopping your custom wallpaper from responding. It’s time to get to the heart of the matter.

    How can I fix Opera GX wallpaper not working issue on PC?

    Below is the list of fixes that could resolve the issues like wallpaper not working on Opera GX browser on your Windows PC.

    1. Check the browser settings

    1. Click on the Opera logo and select Settings.
    2. Scroll down from the top of the page to find Wallpapers.
      enable wallpapers option
    3. See if the Use custom wallpaper option is enabled; if not enable it.
    4. Open a new tab and see if the wallpaper is now working.
      opera GX wallpaper

    Shortly, this simple workaround may be a plausible cause if the custom wallpaper stopped working on Opera GX. In case it didn’t fix the issue already, check the next solutions.

    2. Verify if the browser is up-to-date

    1. Select the logo button on the top-left and choose Update & Recovery.
      Update recovery settings
    2. In this window, click on the Check for updates button.
    3. Wait for a bit and see if the browser has the latest version.
      Opera GX updates
    4. If not, update it directly from there to fix the issue.
    Opera GX

    Opera GX

    Get the latest update of the Opera GX gaming browser and fix the issue.
    Download Install Now

    3. Uninstall the conflicting extensions

    There is a chance to meet this problem due to corrupted extensions on your GX browser. To check this, follow these steps:

    1. Click on the cube icon on the top-right pane to open Extensions.
    2. Select the Manage extensions button.
      manage extensions button
    3. Next, check each extension you use to see if it’s behaving normally.
      opera GX extensions list
    4. If it blocks or it gives you glitches, disable it from the menu.
    5. Verify if the wallpaper is now showing on the homepage.

    4. Toggle off battery-saver options

    1. Select the Easy Setup button and go to the last Full browser settings option.
      access the full browser setting
    2. Go to the search box at the top bar and write Battery saver.
    3. The results will appear so disable the Battery saver option there.
    4. After disabling the option, check if the wallpaper is active.

    5. Clear the cache data

    1. Click on the Opera logo button and select Settings.
      Stop Opera GX from Opening on Startup
    2. Go to the Privacy & Security menu.
    3. Now, click on the first option named Clear browsing data.
    4. In the prompted window, select Cache images and files and set a time range.
      Cache images and files
    5. Simply select the Clear Data button.

    After applying the steps mentioned above, you should be able to finally get back to personalize your browser with your favorite wallpaper. It’s worth mentioning that these fixes work for live or animated wallpapers as well.

    Be sure to apply our guided workarounds here to bring back control over this beloved gaming browser. You may be lucky and fix it with a couple of clicks. If it didn’t happen in your case, do not get stressed, and contact us in the comments section below for more help regarding wallpaper not working on Opera GX

  • How to Install Avast Secure Browser on Windows 11

    How to Install Avast Secure Browser on Windows 11

    Avast Secure Browser, formerly known as Avast SafeZone browser is designed to provide users a secure and private browsing experience. Previously, it used to come bundled with antivirus as an option, but one can install it from its website as well.

    It is based on the open-source Chromium project just like many other privacy-focused browsers. It is available for all the widely-known operating systems, including Windows 11 and the installation is not difficult.

    The web browser from Avast has built-in privacy features such as anti-phishing and anti-tracking to protect users. Additionally, the browser automatically blocks online ads to improve website load time. It also offers tab grouping, tab hibernation, and tab pinning to help users manage their tabs more efficiently.

    One of the reasons why you should download the Avast Web browser is the web encryption and safer navigation against trackers or even hacking attempts. For that reason, it is also considered the most used browser in Australia and the US.

    Where do I get Avast Secure Browser?

    You can easily find and install the Avast browser for PC from the dedicated browser download page and that too for free. All you have to do is press the free Download button and get the browser. Even so, you might already have installed the old browser version and you need to uninstall Avast SafeZone Browser first.

    Once you press the Avast Secure Browser download button, the installation process will begin and you can start by following the process. Plus, we can fully support you with getting the browser safely on your Windows PC or mobile device.

    How can I install Avast Secure Browser on my Windows 11 PC?

    There is a single official way to install the browser on Windows 11 devices and we’re going to show you the full walk-through. So, let’s begin!

    1. Head over to the official Avast Secure Browser download page.
    2. Click on the Avast web browser Free download button to start the process.
      download Avast
    3. Open the File Explorer Downloads location and right-click on the setup file.
    4. Click on Run as an administrator to start the installation.
    5. Select Yes on the UAC dialog box to continue.
    6. Optionally read the Privacy Policy or License agreements and make it as default if you like.
    7. Press the Accept and Install button.
      Install Avast browser
    8. Now, wait until the installation progress is done and start browsing on the new tool.
      Avast browser platform

    So, this is how you install the Avast Secure browser on your Windows PC. You can now explore it more and see if it could fit your preference.

    You can now surf online without worrying about security issues like phishing attacks or aggressive ads that are threatening your online presence.

  • How to Fix Opera GX Mods Not Working  [2023 Easy Guide]

    How to Fix Opera GX Mods Not Working [2023 Easy Guide]

    So, you installed one of the best mods on your Opera GX browser but they are not working properly. Well, the reason can be anything and we are here to discuss some of the fixes.

    However, it’s important to know the type of issue first. There are several known issues that might be troubling you. For example, Opera GX background music not working issue.

    Likewise, there are other unpleasant scenarios in which the mod wouldn’t work on this browser. The most popular mods problems are the following ones:

    • Opera GX mods won’t install
    • No sound mod issues
    • Mods blurry issues
    • Shaders not working

    If you’re a passionate gamer and have already installed your favorite mod on the browser, you should also know how to enable shaders in Opera GX, so to transform your gaming experience even further. Shaders are responsible for creating realistic lighting, shadows, reflections, and other visual effects in video games.

    How do I add Mods to Opera GX?

    The procedure for quickly adding mods to your browser is quite intuitive, so let’s get started with the next steps:

    1. Go to the official GX mods store and select any mod.
    2. On the description page, find the Install button and click on it.
      install opera GX mod
    3. The mod will be added instantly on the Mods section.
      opera GX mods
    4. Go to Mods on Opera GX and check if it’s enabled.

    What does web modding do in Opera GX?

    Essentially, Opera GX web modding is a procedure that changes the way your browser looks or behaves. The mods can adjust the homepage with new themes, background sound, or gaming improvements.

    Before tackling the detailed methods to solve this browser problem, you can also perform the following pre-checks to eliminate the possible causes:

    • Reinstall the browser to reset the mod’s functionality
    • Try to install different mods a couple of times
    • Restart your PC and check if the mod is working

    So first off, reinstall Opera GX and see if it rectifies the problem.

    How can I fix Opera GX mods not working?

    The possibility of Opera GX mods not working on the browser is relatively high. However, you shouldn’t run out of hope as they can be resolved with some mere effort.

    1. Update your mods in the browser

    1. Go to the official mods store and search for any installed mod.
    2. Scroll down and press the Uninstall button.
      uninstall mod opera GX
    3. Press the Install button to get it back with the latest updates.
    4. Try to enable the mod again and see if works.

    2. Verify the Internet connection

    Another potential cause of this browser trouble may be your unstable Internet connection. To check this aspect, you can run the network troubleshooter on your PC and identify the cause.

    Afterward, apply the guidelines of the operating system and try to fix the connection problem automatically. If that is the cause, the browser should run with the installed mod after re-establishing the network connection.

    Not only that but also check if the site connection is secure and the webpage is not stuck.

    3. Clear the browser cache

    1. Click on the Opera logo button and select Settings.
      Stop Opera GX from Opening on Startup
    2. Slide over to Privacy & Security menu.
    3. Now, click on the first option named Clear browsing data.
    4. In the new window, select Cache images and files and set a time range; likely from 7 days up.
      Cache images and files
    5. When you’re ready, click on the Clear Data button.

    Apart from cache data, you can get Opera GX mods to work by simply resolving other lesser-known issues. For instance, you can stop Opera GX from opening on startup and verify if the problem was linked to it.

    4. Make sure the mods are enabled

    1. Open the browser and select the Mods button in the sidebar.
    2. In the Mods menu, scroll down to see all your installed mods.
    3. Check if your current mod is enabled and the first in line.
    4. Plus, see if there are other mods activated that overwrite your mod.

    So, remember to check each of your installed mods to make sure they don’t overwrite and that there are not multiple ones working simultaneously.

    In conclusion, you can follow all the step-by-step solutions to resolve Opera GX mods not working issues and enjoy your browsing. You can also reach us in the comments section below for other queries or instructions regarding this browser mods problem.

  • How to Stop Microsoft Edge from Opening PDFs

    How to Stop Microsoft Edge from Opening PDFs

    You can stop Microsoft Edge from opening PDFs in the browser and let a dedicated app does the work. You just have to tweak a few settings in the browser to take control of the situation because it’s better to let a dedicated app handle its work than a browser usage.

    That being the case, bypassing the issue and learning how to keep Microsoft Edge from opening PDF files is essential.

    By doing so, open and read different files in one tab or save files directly in PDF format on your desktop screen. Needless to mention, this move doesn’t stop you from other actions, which means you can save a webpage as a PDF and launch it using your tailored software.

    All having been said, we tested and simplified the process of changing the default app for opening PDF files so you can apply it seamlessly on your own. That will help you learn how to stop Microsoft Edge from opening .pdf and .html files.

    Why does Microsoft Edge keep opening my PDF files?

    The Microsoft Edge browser keeps opening your PDF files because it has a built-in PDF viewer that is enabled by default on Windows. So, whenever a PDF file appears, it opens the same right away. But, you can take control of it and stop Microsoft Edge from hijacking PDF files from a dedicated app like Adobe Acrobat.

    You may need support to change the file association settings and fix Edge keeps opening PDFs in the browser issue.

    Worry not, as you can use the following solutions and learn how to stop PDF files from opening in Edge on Windows 10 and Windows 11. So, you can remove the problem and visualize all your PDFs with dedicated desktop readers.

    How do I stop Edge from opening PDF files?

    1. Change the default browser on your PC

    First off, you can change the default app on Windows so that all the PDF files open in that selected app. Just follow the below steps to choose Adobe Acrobat as your default choice for opening .pdf files rather than Microsoft Edge.

    1. Type Apps and open the Default Apps settings from the search bar.
      Stop Microsoft Edge from opening PDF files
    2. Write pdf in the search bar under Search a default for a file type.
    3. Now, click on the new window button on the right side.
    4. In the new Choose a default app window, select any other suggested apps.
    5. Click on Set default and close the window to see if the PDF file is opening accordingly.

    You can also disable the PDF viewer in Microsoft Edge without changing the default app by completely changing the browser. In this case, you can choose Opera One browser as your default choice to open the files.

    This browser can be set to automatically open PDF files naturally and view your files quickly, grouping multiple file tabs in one set or downloading the pages seamlessly. Hence, this solution is the most proper way to solve Edge keeps opening PDFs in browser issues.

    Get Opera One

    2. Modify settings in the Microsoft Edge browser

    1. Launch the Edge browser and select Settings or type edge://settings/content/pdfdocuments
    2. In the Settings tab, select Cookies and site permissions.
    3. Scroll down until you find the PDF documents option and click it.
    4. Here, toggle off the first option that says Always download PDF files.
    5. Close the Settings window and check if the PDF files are opening with your default app.

    After applying the steps above, make sure you have set the default app you prefer to open any PDF documents on your PC.

    In case you change your mind and do not wish to follow the above-mentioned steps then you should resolve any plugin loading error first so to keep away any file viewing troubles.

    As a matter of fact, you can as well compare Microsoft Edge with other browsers and see which one works best for you. So if you’re not sure about what browser to pick next, take a look at our verdict for Edge vs Brave vs Chrome browser comparison.

    So, now you know that you can prevent Microsoft Edge from automatically opening PDF files in the browser and choose to open them in an external application instead.

  • Opera GX AI Prompts: How to Enable & Disable

    Opera GX AI Prompts: How to Enable & Disable

    Opera GX, the gaming-oriented web browser introduced AI prompts in its address bar to allow users quickly access AI services. These new AI prompts feature is currently in Early Access and one can try them to shorten or explain articles, generate tweets, and more based on highlighted text.

    In addition to these AI prompts, Opera GX has added ChatGPT and ChatSonic to its sidebar for quick access to the platforms.

    Opera integrated AI capabilities into its gaming-centric browser so that users could leverage more. These prompts have been created together with Open AI. They use ChatGPT and ChatSonic to explain or summarize the text you highlighted.

    One can also install AI extensions to get things done, but having prompts enabled right inside the browser gives more ease.

    Opera GX

    Opera GX

    Opera GX is a gaming-centric browser that has a range of features and optimizations specifically crafted for the gaming community.
    Download Install Now

    What are Opera GX AI prompts?

    Smart prompts on Opera GX browser are nothing but instructions or seed text provided to elicit a desired response. These instructions are preset and you don’t have to write a complete text or code in order to get a response.

    For instance, Opera GX has an AI prompt called “Shorten,” which shortens the highlighted text in a mere click. Otherwise, you’d go to any AI tool or ChatGPT and input that sentence first and ask it to shorten it. AI prompts save your time and improve your browsing experience.

    How do I enable AI prompts in Opera GX?

    Follow the below steps if you can’t see the AI prompts tab inside the address bar.

    AI prompts in the Opera GX browser are enabled by default. Just make sure you’re using one of the latest updates of the browser. It’s assumed that you’re using Opera GX as your default browser but you can also stop the Opera GX browser from opening on startup.

    1. Click on the easy setup icon in the sidebar
    2. Scroll down to see a section called “AI Prompts”
    1. By default, all three options are enabled.
    2. Once enabled, you’d see AI prompts tab in the address bar of Opera GX browser

    Note: The AI prompts tab appears when you open a webpage so that you could leverage them. You may not see them in the address bar on SERP results.

    1. The list of smart AI prompts includes ‘Shorten,’ ‘What’s the main point,’ ‘Find the related content,’ ‘Create a tweet,’ and ‘Create a meme idea.’

    How do I turn off AI prompts in OperaGX?

    If you do not wish to see AI prompts tab in the address bar or in the text highlight popup, you can simply disable the feature. Just follow the same instructions up until step 3.

    Simply disable the AI prompts toggle switch and both “AI prompts in address bar” and “AI prompts in text highlight popup” will turn off at the same time. You can also disable either option in case you do not wish to get rid of them completely.

    In addition to AI prompts, Opera GX has also added AI features to its sidebar in the form of special features ChatGPT and ChatSonic. This way Opera GX gives you direct access to language models. So, other than quick access to some smart prompts, you can do more using AI features in Opera GX.

    It is possible that Opera may bring more AI prompts in the future, but it hasn’t made any such promises.

  • How to Use Opera GX Password Manager to Retrieve Passwords

    How to Use Opera GX Password Manager to Retrieve Passwords

    Opera GX, a special version of Opera browser designed specifically for gamers, does have a Password Manager to let you save and view passwords. Just like other browsers, Opera’s gaming browser has this built-in setting where gamers can save their passwords and retrieve them whenever needed.

    Password managers offer convenience as they eliminate the need to remember lengthy and complex passwords. You just have to remember one master password, and it will take care of the rest.

    They automatically populate usernames and passwords for the websites from the list of saved passwords, eliminating the need to manually type them every time. Thus, it saves time and unnecessary effort. Our guide will show you how you can save, retrieve, import, export, and remove passwords using Opera GX Password Manager.

    If Opera GX is your preferred browser, you can set it as your default browser. You can also disable Opera GX at startup if you don’t want the browser to get opened every time you’re starting your machine. Exporting bookmarks from the Opera browser is not difficult either.

      Opera GX

    Opera GX

    Install Opera GX, a special Opera browser dedicated to gamers.

    How to Save and View Passwords in Opera GX Browser?

    Saving and managing passwords using the Opera GX password manager is simple. You have to tweak a setting to get started. So, let’s dive straight into how you can use a password manager on the Opera GX gaming browser and enjoy hassle-free logins on your favorite gaming sites.

    1. Click on the hamburger menu provided in the top right corner of the browser and look for Go to full Browser Setting.
    2. Click on Privacy & Security from the sidebar.
    Opera GX Privacy Settings
    1. Scroll down and click Advanced.
    Opera GX Password Manager
    1. Now, you will see the Autofill option that includes Password Manager.
    Opera GX Password Manager feature
    1. Click on Password Manager in order to allow the Opera GX browser to save your password.
    2. A new panel will open that lets you save passwords that offer three options.
    3. Toggle ‘Offer to save passwords.’

    These steps will save your passwords with the Opera GX browser.

    Note: By default, the Opera GX browser saves your password. You can disable it by following the aforementioned steps.

    Opera GX Password Manager gives you the choice to save your password whenever you log into a website. If you click ‘Never,’ that site will be added to Opera GX’s never saved list.

    It’s worth mentioning that in order to use Password Manager you have to first sign in to the browser. As the passwords get linked to your Account.

    How Can I Retrieve Stored Passwords in Opera GX?

    Once you’ve chosen to save passwords using Opera GX password manager, you can retrieve them anytime. After following the steps mentioned above, toggle the Auto sign-in option as well. This will allow Opera GX to automatically fill in your saved credentials.

    You can also manually add a website name, username, and password to Opera GX in order to let the browser save your credentials for specific websites.

    In order to let Opera GX browser save your sensitive credentials like credit or debit card information and address, go back to Advanced Settings and look for Payment methods and Addresses and more options.

    Opera GX Password Manager Payments Method


    By default, Opera GX saves payment methods but if you don’t want the browser to save this information, you can choose to disable them completely.

    You can also manually add Payment methods to the Opera GX browser to quickly make payments. By doing so, you don’t have to enter your card details every time you’re going to make payments. Note that these details are saved on the current device only.

    You can also import and export passwords on the Opera GX browser.

    How Can I Remove Saved Passwords from Opera GX Browser?

    Opera GX password manager lets you remove saved passwords as well. Go to Password Manager once again and look for the list of saved passwords

    Click on the three-dot menu right beside the website for which you want to delete the password and click on Remove. This will delete the saved passwords from the Opera GX browser.

    The steps are pretty simple to follow similar to how you clear autofill on Chrome. The same Password Manager on Opera GX also shows the list of ‘Never’ Saved websites for which passwords have never been saved.

    So, these were the simple steps to save, manage, and retrieve passwords using Opera GX Password Manager. If you find any difficulty using the Password Manager, let us know and we will try to come up with a solution.